Wednesday, February 21, 2007

linking up


A web page on its own is a lonely thing. Fortunately we can link it up with friends using the ultra-hip hyperlink (known to its friends as the anchor tag).

This Tizag article is a good introduction, but it doesn't discuss the depricated attributes (these are the bits that are no longer supported - usually because CSS does a better job). I'd recommend a follow up reading in the XHTML tutorial which covers these aspects.

Once you've read through these, have a bash at the hyperlink challenges I've set up for you on the wikiversity - if you've done the lists.html page, use this as your target for local links, and add a link on the lists page back to your links.html page so you can navigate backwards and forwards between them. Upload the lists.html and links.html pages to your web site and drop me a line so I can have a look at how you're getting on.


Image: 'ORLY?'

making a list and checking it twice

Today's post is being brought to you by the HTML tags: UL, OL and DL...

Lists are a handy styling element for presenting data in bite sized pieces. HTML gives you three basic flavours: the unordered list; the ordered list; and the definition list. Find out how each of these is works in this List Tutorial

Once you've mastered the syntax, flex your list building muscles with the Lists, lists and more lists HTML challenges. Save the exercises as a web page called lists.html and nestedlists.html - we'll be using them later to practicing linking.

Want to see something really cool? Listamatic takes a plain unordered list and CSSs the snot out of it - it's got to be seen to be believed.


Image: 'New holiday: No Internet Thursday'

Monday, February 19, 2007

Moovin and a groovin

Time to upload a file.

First up, we'll need to understand what file transfer is all about - the wikipedia article's a good spot to find out.

Next, we'll need an ftp client to play with. Peruse the list on wikipedia, or search google and select one that will fit your pocket and operating system.

Install your client of choice and connect to the bathurst tafe web server using the login details provided (if you've lost them, or not received them yet, give me a call and I'll see what I can cook up). Once you're logged in, upload the index.html file you created earlier and see if you can bring it up in a web browser: http://www.bathurst-tafe.nsw.edu.au/~yourname

Got troubles?

  • make sure you're using Active rather than Passive transfers in your ftp client
  • double check the user name and password
  • remember, if you're in the computer lab, our ip address is different from the bathurst-tafe.nsw.edu.au address
  • the web server can only see the public_html folder
  • you may need to change the permissions on the file so that others can read it
Once you finish this challenge, go to (or create) your blog and write a short post on the experience. Make shure you mention:
  • The name of your ftp client
  • The URL you got it from
  • any installation woes you encountered
  • some comments on its ease of use
  • $
  • the platform(s) it works on
  • the install file size
and any other interesting bits of information you came across

Create a basic document

Time to catch up with a few things...

For a path through the HTML/CSS maze, you could do worse than to try the following exercises and tutorials:

Once you get your head around this, create a new web page about yourself: index.html using the tricks you've just learnt.

Tuesday, February 13, 2007

Welcome to a new year of web development


For those of you just starting, a warm welcome to the 2007 web development course. And welcome back to those of you who are continuing their learning journey.

I haven't been idle over the break. Together with a teacher at Blue Mountains TAFE I've been helping to build some web development resources on the wikiversity. We've outlined the course onthe Cert IV Websites Qualification in Australia and will be building this into a complete course over the coming months. If you're just starting out, the page for ICAB4135A, Create a simple mark-up language document to specification could prove useful.

If you're just beginning, a visit to Tizag for some practice with their beginner tutorial might help. For those a little more comfortable with HTML, we'll be working through the Tizag HTML lessons over the next few weeks; with an emphasis on using CSS in place of attributes to change the look of our HTML.

If you're already using HTML try out some of the HTML challenges we've put together.

I'll be dropping by here regularly with more suggestions about picking a path through the study material, and talking to you all each week, but don't be shy about getting in contact - call me on 6338 2448 or email peter.shanks at tafensw.edu.au - another interesting option for you might be to start your own blog here on blogspot. Use it to keep a learning journal - jotting down notes, observations and questions after each study session. If you do, drop me a line with the url and I'll add it to the blogroll here.

All the best with your studies, this should be a fun year I think.


Image: 'Footprints'
by: Joshua Davis

Tuesday, November 28, 2006

a quick note on .htaccess

here’s a little about using .htaccess to protect your phpMyAdmin directory


It protects a directory through 2 files; .htaccess and .htpasswd – you can read all about it on this Comprehensive guide to .htaccess


There’s an online tool you can use to create these files at the .htaccess Generator


Enter your user name and your current password (this is not compulsory, but convenient), and /srv/www/[yourusername]/public_html/phpMyAdmin/ as the path. (note, no tilde in the user name). Then Copy the information returned by the online tool and save the first file as '.htaccess' and the second file as '.htpasswd'. Upload them (as ASCII) to your public_html/phpMyAdmin/ directory and viola, it will be password protected.

Monday, September 25, 2006

JavaScript and the DOM


Sorry folks, I’ve twisted my ankle and I’m not going to be able to make it in today. I know you’ll all miss me, but to dull the pain of separation, here’s a couple of tutorials to be going on with:

Javascript Basics Part 6 (internal link)

talking about the Document Object Model or DOM for short.

and…

Javascript Basics Part 7 (internal link)

examining the document object and the window object, both of which offer many useful functions.

When you’ve finished these you might like to try applying them to the Greening Bathurst form, so that error messages are displayed on the web page alongside the fields that they are all about (rather than in an alert box).

Want more? Have a look at error handling and AJAX:

Javascript Basics Part 11 (internal link)

how to account for errors and several different methods for general error handling.

Followed by:

Javascript Basics Part 10 (internal link)

An introduction to AJAX


Image: ‘A pint for the discerning standardista

Monday, September 04, 2006

Building a data-driven web site (reposted)


this was originally posted last month, but got lost somehow, so here it is again in all its warty glory...

It's been a while, so this is likely to be a lengthy post...

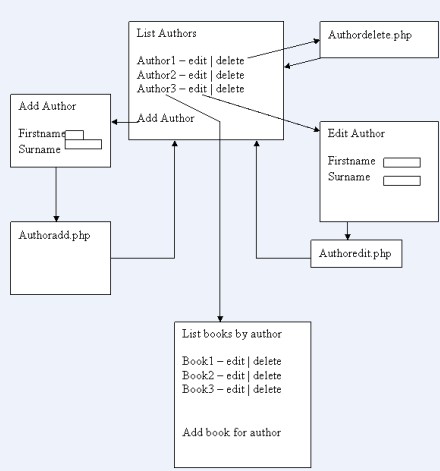
To start off, we're going to look a the topography of our data-driven book site: a page that lists all the authors, with links from each author's name to a page that lists the books written by that author. For maintenance, we'll add pages that allow author records to be added, edited and deleted.

Before we get stuck into this, we'll need to know how to communicate with our database using SQL (structured query language) statements. Have a look at the SQL CHEAT SHEET for some examples of SQL that select, update, insert and delete records from a database. You can experiement with these in myPhpAdmin by opening a SQL window and typing in commands.

Master/Detail Pages

For our first page we're just going to display a list of authors. The pseudocode for this operation would read something like:
connect to the database engineselect a database to useexecute a SQL statement to retrieve some records from the databasedisplay each record on the web pageand the php code to accomplish this might look something like:

<?php

// connect to the database engine
@ $db = mysql_pconnect('localhost','username','password');
// do some error checking
if (!$db) {
echo 'error: couldnt connect to the database';
exit;
}
else {
//echo ' all ok with connection';
}

// select a database on the database server
mysql_select_db('your_db',$db);

// execute a SQL query to select records from the authors table
$result = mysql_query('SELECT * FROM authors');

// display each record on the web page
$numresults = mysql_num_rows($result);
//echo $numresults." records found";
for ($i=0; $i<$numresults; ++$i) {
$row = mysql_fetch_assoc($result);
echo $row['firstname'].' '.$row['surname'].'<br />'';
}

?>


So far, so good. But we want more, vis: links from the author names to a page that lists all the books they've written, so we'd need to update the echo statement to look more like:
echo '<a href="titles.php?authorID='.$row['authorID'].'">'.$row['firstname'].' '.$row['surname'].'</a><br />'';Wha? I hear you ask...

Quite simple really; we've wrapped an anchor tag around our author names, linking them to (an as yet unwritten) page: titles.php, which will list all the books written by that author.

So that our new page can list just one author, we need to give it a hint about what author we're interested in, and we do this by appending the authorID to the URL: ?authorID=nnn, where nnn is grabbed from the database and pasted into the link, a unique ID for each author.

At the other end (on the titles.php page), our script will grab this ID using $_GET and use it to build an SQL statement which gets just those books written by our author. Something like:

<?php

// connect to the database engine
@ $db = mysql_pconnect('localhost','username','password');
// do some error checking
if (!$db) {
echo 'error: couldnt connect to the database';
exit;
}
else {
//echo ' all ok with connection';
}

// select a database on the database server
mysql_select_db('your_db',$db);

// execute a SQL query to select records from the authors table
$result = mysql_query('SELECT * FROM titles where authorID = '.$_GET['authorID']);

// display each title on the web page
$numresults = mysql_num_rows($result);
//echo $numresults." records found";
for ($i=0; $i<$numresults; ++$i) {
$row = mysql_fetch_assoc($result);
echo $row['title']<br />'';
}

?>

Note the php which grabs our authorID from the URL and sticks it onto the end of our SQL statement:
'SELECT * FROM titles where authorID = '.$_GET['authorID']
Nice and easy, yes? On to...

Adding New Records

To add a new record we need to write a form with text inputs for each field in the table, and link to this new page from our original authors list. So, to start we'd add a little line of HTML to our authors.php page:
<a href="admin/authoradd.php">Add a new author</a>(note, we're putting our administration pages in a new sub-directory called admin. More on why later)

The form itself is rather simple, just asking for the firstname and lastname of our new author (we don't need to get an authorID because this is an autonumber field and the database will do this for us). Something like this should do the trick:

<h1>Add a New Author</h1>
<form method="post" action="authoradd2.php">
<table border="0" cellpadding="3" >
<tr>
<td>First Name:</td>
<td><input type="text" name="firstname" /></td>
</tr><tr>
<td>Surname:</td>
<td><input type="text" name="surname" /></td>
</tr><tr>
<td></td>
<td><input type="submit" value="Add Author" /></td>
</tr>
</table>
</form>

For simplicity the form will submit (POST) to a second php page: authoradd2.php which will do the actual work of creating the new record. The pseudocode for this operation would be:
Get the form elements into variablesConstruct an SQL statement from these to insert a new recordConnect to the database engineSelect a databaseExecute the SQL statementRedirect back to the authors list (authors.php) to display the new authorand the code might look something like:

<?php
// get the firstname and surname from the form
$firstname = $_POST['firstname'];
$surname = $_POST['surname'];

// build the SQL statement which will insert a record
$sql = "INSERT INTO authors (firstname, surname) VALUES (' ".$firstname." ', ' ".$surname." ') ";

// connect to the database engine
@ $db = mysql_pconnect('localhost','username','password');
// do some error checking
if (!$db) {
echo 'error: couldnt connect to the database';
exit;
}
else {
//echo ' all ok with connection';
}

// select a database on the database server
mysql_select_db('your_db',$db);

// execute the SQL statement
$result = mysql_query($sql);
// check that it ran correctly
if (!$result) {
die('Invalid query: ' . mysql_error());
}

// redirect to the authors list to show the results
header("location: ../authors.php");

?>

let's move on now to...

Editing a Record

This is really a combination of things we've already done. Firstly, we need to add an 'Edit' link next to each author's name (which must include the authorID in the URL). This would mean changing our authors.php file so that each author would be displayed as:

echo '<a href="titles.php?authorID='.$row['authorID'].'">'.$row['firstname'].' '.$row['surname'].'</a><a href="admin/authoredit.php?authorID='.$row['authorID'].'">edit</a><br />'';

The important new part being:

<a href="admin/authoredit.php?authorID='.$row[authorID].'">edit</a>

And the new authoredit.php page? It would take the authorID, select the author record from the database, and populate a form with these values, allowing the user to edit them. Someting like:

<?php

// connect to the database engine
@ $db = mysql_pconnect('localhost','username','password');
// do some error checking
if (!$db) {
echo 'error: couldnt connect to the database';
exit;
}
else {
//echo ' all ok with connection';
}

// select a database on the database server
mysql_select_db('your_db',$db);

// execute a SQL query to select the author record from the authors table
$result = mysql_query('SELECT * FROM authors where authorID = '.$_GET['authorID']);

?>

<h1>Edit Author</h1>
<form method="post" action="authoredit2.php">
<table border="0" cellpadding="3" >
<tr>
<td>First Name:</td>
<td><input type="text" name="firstname" value="<?php echo $row['firstname'] ?>" /></td>
</tr><tr>
<td>Surname:</td>
<td><input type="text" name="surname" value="<?php echo $row['surname'] ?>"/></td>
</tr><tr>
<td><input type="hidden" name="authorID" value="<?php echo $row['authorID'] ?>" /></td>
<td><input type="submit" value="Add Author" /></td>
</tr>
</table>
</form>

One trick to note: the authorID is being passed to authoredit2.php as a hidden field:

<input type="hidden" name="authorID" value="<?php echo $row['authorID'] ?>" />

We don't want the end user to edit this value, but need to send it through so it can be used when updating the record. Once submitted the form calls authoredit2.php, which performs the following operations:
Retrive the form valuesBuild an SQL statement from them to update the recordConnect to the database engineSelect a databaseExecute the SQL statementRedirect the user to the authors list to display the resultsI won't bore you with a full listing, just the first 2 steps:

// get the firstname, surname and authorID from the form
$firstname = $_POST['firstname'];
$surname = $_POST['surname'];
$authorID = $_POST['authorID'];

// build the SQL statement which will insert a record
$sql = "UPDATE authors SET firstname = '".$firstname."', surname = '".$surname."' WHERE authorID = ".$authorID;

The biggest trick here is to remember to wrap any text strings inside single quotes for the SQL statement. This can call for some tricky double quote stuff in the php. Perhaps a view of the final SQL will give you an idea of what we're aiming at here. If, for example, I wanted to author number 1 in the database to assume my name the SQL would look like this:
UPDATE authors SET firstname = 'Peter', surname = 'Shanks' WHERE authorID = 1
Nearly done now, just one more thing:

Deleting Records

Lucky for us, this is really the easiest operation so far. All we need do is add a little code right next to our edit links on the authors.php page:


<a href="admin/authordelete.php?authorID='.$row['authorID'].'">del</a>

As with the edit link, we're passing each author's ID in with the URL. This time we don't need a form, just the php to build the SQL and execute it before redirecting us back to the author list page:

<?php
$authorID = $_GET['authorID'];
$sql = "DELETE FROM authors WHERE authorID = ".$authorID;
require("../connection.php");

$result = mysql_query($sql);
if (!$result) {
die('Invalid query: ' . mysql_error());
}

header("location: ../authors.php");
?>

Of note here: I got sick of writing the database connection and selection code over and over. Instead I put it in a seperate file: connection.php, which I included in this one with the php function: require("../connection.php");

And that's it - we've built a fully functional, data-driven set of web pages. If you want to practice your skills further, add some pages which allow you to view book details when you click on titles, and add, edit and delete titles from the database.

Sessions


So, we've been looking a bit at session variables. The scenario:

we're displaying a screenful of data to our web site visitors (like a list of authors), and we want to give authorised users the option to edit, delete and add new records - but we want to hide these pages from the average viewer. First, we need a login screen.

A simple form asking for a user's email and password should do. When the form's submitted, these fields would be checked against a database of users. Then the magic occurs...

If the user's email and password match, we'll be setting a session variable, that will let us know that they're authorised to see the administrative pages and links.

Sessions are like server-side files that store variables that can be read from, or written to, by PHP scripts. Each session file is unique to the user that created it and can only be accessed by subsequent requests from the same user.

For our login, we'll be setting a session variable called loggedin. The first piece of code on the page, and all other pages that need to access the variables, will be:

<?php session_start(); ?>

This piece of code does one of two things. If the user does not already have a session, it creates a new session - or - if the user does already have a session it connects to the existing session file. When a new session is created, PHP session management generates a session identifier.

After calling the session_start function, we're ready to do the email/password comparison with the user details in the database (you can do that), if they match we'd set the session variable:

$_SESSION['loggedin'] = 'true';

Subsequenly we can check for this value on any page. To selectively display bits of html (links to edit and delete functions, for example) we might add:

<?php
session_start();
if ($_SESSION['loggedin'] == 'true') {
echo 'Edit>';
}
?>

If we were restricting access to a whole page (say the add, edit or delete pages), we might add some code like this:

<?php
session_start();
if ($_SESSION['loggedin'] != 'true') {
header("location:login.php");
}
?>

This code checks to see if the session variable loggedin is set to true. If not, it redirects the user to the login page.


Thanks to iconjon for the pic

Sunday, June 04, 2006

What should we build today?


Here's a little task that should cover the remaining assessment events for a bunch of modules: complex mark up language documents, emerging web technologies, introduction to programming and the client server envirnoment. It's due on the 19th June 2006

The problem

I'd like you to create a web based form that allows someone to enter event details (these could be for greening bathurst events, an upcoming gig for your band, your social calendar, whatever).

The form should allow for the entry of a date, title, description, location and and url to further event details (or a web site home page if there are no details online).

Once submitted, the form should call some script that creates an RSS file with the event information. For now we'll assume that there will only be one event at a time in this file, but in a later, database driven version, we'll be looking at how to list multiple events.

What you need to produce

For 3756V - Introduction to Programming

  • An IPO table of the process

For 3756Y - Complex Mark Up Language Docuemnts
  • A form for entering the data. To make the date input unambiguous, allow the user to select days, months and years from dropdown boxes.
For 3756Y - Complex Mark Up Language Docuemnts, 3756X - Emerging Web Technologies & Standards and 3756W - WWW Client Server Envirnoment
  • An RSS file for the event generated by some PHP script. This can be in RSS 0.91, 1.0 or 2.0 format but it must be validated
For 3756Y - Complex Mark Up Language Docuemnts and 3756X - Emerging Web Technologies & Standards
  • a link to the RSS feed from a web page. The link should be from an image like this:
For bonus marks
  • see if you can add some client side JavaScript that prevents users from submitting the form with empty fields

What I need to see on or before the 19th June, 2006:

An assignment cover sheet attached to a copy of your IPO diagram and URLs to the pages with your RSS feed link and your form for entering new events.

Hints

You might find the followning web sites useful:


Thanks to The One True Stickman for a picture of his junk corner

Monday, May 29, 2006

Create your own development environment - just add water

In the real world you will need a place to try out new web pages before you make them 'live' on the customer facing web site.

Today we're going to build a development environment that allows us to try out dynamic PHP pages on our local machines, with a database thrown in for good measure.

The ingredients we'll need are:

  1. a web server (we'll use Apache)
  2. the PHP interpreter
  3. the database engine (MySQL)
  4. some database management software (phpMyAdmin)
Getting all these things installed and playing nicely together can be a bit of a task. Fortunately there are folks out there who have done it already. One of those, dWebPro, will also run from a stand alone CD which you can give to your customers, relatives and friends.

To save on download times, I've put copies up on the local server - have a look in the dWebPro directory (or go here if you're inside the firewall) and you'll find the following files:
dwebpro_6.5.0.exe       7.9M - the web server
mysql40_package.exe 5.4M - the database software
php4_package.exe 7.5M - the PHP interpreter
phpmyadmin_package.exe 2.9M - database admin software
Download and install each of these in turn on a PC running Microsoft windows and you'll have your very own development environment.

Testing
If you installed with all the default options you can run the web server by clicking on the dWebPro icon on your desktop. After the spash screen you should see the phpMyAdmin screen displayed in the web browser. Note the URL. It doesn't point to a local file but calls http://127.0.0.1:8080/phpMyAdmin/ - you're looking at a page that's being served by a real live web server running on your PC with a local ip address (127.0.0.1, using port 8080).

Using it in anger
Now to try it out for yourself. Copy the form and php pages we created last week into the web server home directory. This should be: C:\DWebPro\deploy\www if you used the default installation.

Now open up the form page by entering it's server address in your browser's address bar. Something like: http://127.0.0.1:8080/testform.html

Submit the form, read the results and take a break.


thanks to David Reeves for "High Purity"

Sunday, May 28, 2006

CSS and multiple media

You might remember, way back when, that I mentioned that your web pages' CSS links can have a MEDIA attribute, which specifies the medium or media to which the style sheet should be applied.

This means you can have one lot of CSS for the screen, and another for - oh, lets say, the printer

it turns out there are ten defined media types:

  • all
  • aural
  • braille
  • embossed
  • handheld
  • print
  • projection
  • screen
  • tty
  • tv

Print is the one you'll see most commonly used. You can find out why, and some of the common tricks used in a print media type CSS file, by reading the article: css vs. media

Try it yourself. Add a print css media attribute to your project 1 hompage which strips out the navigation elements, removes the underlines from links and makes them black, sets the background colour to white, sets the text font to something with serifs and (for bonus marks) prints the URL of clickable links next to the original links on the page - then print it out to make sure it works.

The other up-and coming CSS media star is of course: mobile. The Opera browser folks have a good article on producing mobile content called Making Small Devices Look Great

How do you test the other media attributes?

So, we've seen how to test the print media attribute using your printer. How about the others? Well, you could try looking at mobile types on your G3 mobile phone (or if you're poor you can use an online emulator), and I guess you could always try producing braille types on a handy nearby braille embosser

Of course, if you're using Macromedia Dreamweaver 8, you can use the the "View > Toolbars > Style Rendering" menu option to test various media types in the IDE, including what a page looks like if CSS is ignored altogether.


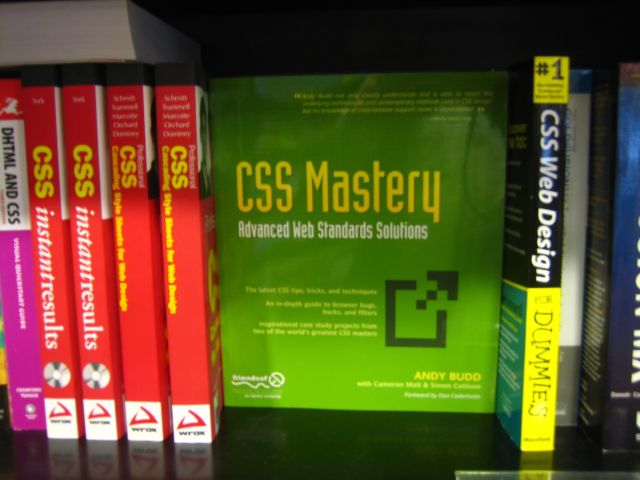
thanks to adactio for the image: "CSS Mastery"

Tuesday, May 23, 2006

Some XML multi-choice practice


I forgot to mention yesterday - I started to add an XML section to the updated toolbox. You can see it on the Bathurst TAFE server (or here if you're inside the firewall).

There's not much stellar content, but I did put together a short quiz with some typical XML questions, the type of thing you'll be doing in the test next week. Just click on the link marked: Test your knowledge of Complex Mark Up Language Documents

On the usability front, I've moved the activities list to the top of the page and shrunk the banner section to a minimal 20 pixels. I've also given the pop-up windows back all the functionality of a full fledged browser (navigation, menus and most importantly: the ability to be resized). What are your impressions? An improvement? Too much form lost for too little function? Or didn't it make any difference? Once more, feel free to post your comments.


Thanks to john© for "And A Quiz To Round Off The Holiday"

Monday, May 22, 2006

Forms II - they're back, and they're not happy...


When we created our first form we used a php script to list all of the global variables - useful for testing the form, but not much good if we want to actually use the information for something. This week we're going to look at how to get individual form elements into variables so we can bend them to our will.

Setting up

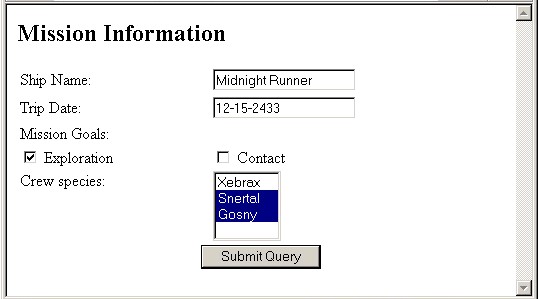
To start off make sure you've given the text area, checkbox and menu form elements meaningful name attributes:

  1. name = "shipname" for the first text box
  2. name = "tripdate" for the second
  3. name = "exploration" for the first checkbox
  4. name = "contact" for the second
  5. name = "species" for the multiselect dropdown menu
Running

To process the form we'll need to create a new php page to process our form: testform.php

This will be a common, or garden variety html page, but buried in the <body> section we need to add a block of php code:


<?php

// set a variable from the shipname field on the form...
$shipname = $_POST["shipname"];

print("Thank you $shipname.");
?>


This code looks for an input control on the form called: shipname and assigns it to a php variable: $shipname, it then writes this variable and a quick thank you on the screen.

Update the form so that it's action="testform.php", and upload both files. Don't forget to set the testform.php file permissions to 'execute' so that the web server can run it.

Debug if necessary and once you have it working, try adding code to display the tripdate and exploration elements.

Being Selective

Did you notice how the exploration control returned a value (perhaps something like 'yes')? What we want to do is try some selection on this value before we write the expedition objectives on the screen. Something like:


print("<strong>Mission Goals:</strong> <br />");

$exploration = $_POST["exploration"];

if ($exploration == "yes") {
print("Exploration<br />");
};


Try adding this code to your own page. You might need to change the comparison string to match the value attribute of your form's checkbox. Once you get this working, add code for showing 'Contact' if the contact check box was selected.

An optional extra:

The final part of the form is a bit trickier. The crew species list can have more than one value selected. This will be returned as an array of values to the php form checking page, and so we need to do a bit of fancy php footwork to access it.

Firstly, we need to give the option control a php array-friendly name. If its currently called: name="species" you will need to add the array delimiters to its name, making it: name="species[]" - you should now have html on your form page which looks something like:


<select name="species[]" size="4" multiple>


In your php file you need to run a for loop through this array, printing each value on the screen:


print("<p><strong>Mission member's species:</strong><br />");
foreach($_POST['species'] as $species) {

print("$species <br/>");
}
print("</p>");


This takes the species array from the post array and itereates through it, assigning each selected species value to a $species variable, which it prints on the screen. Simple really (actually, a bit more advanced that we're expecting from anyone just yet, but I put it in for the terminally curious).

Where to next? I think we'll be using a form for gathering feedback on a website sometime soon, perhaps even for the greening australia assignment, so it would be useful to think about what fields you'd put on this sort of page, and how you might retrieve that information once it was submitted to the server.

Bonus Section

Try adding some radio buttons for the ultimate mission goal:
  1. inter-galactic domination or
  2. creation of a trade hedgonomy
These buttons will also have to be set up as an array, and will need processing similar to the species array.


Thanks to pvera for the picture: "Will code for food"

Image Maps


  1. Read about image maps and try the example

  2. Download and install Mapedit or some other image mapping tool

  3. Save the map above or find some other creative commons licensed map of Australia using flickrlilli (click on the image above for a full-size version)

  4. Make an HTML page with an image map linking each state (and the other countries) to their relevant wikipedia entries.

  5. Upload and link the page to your student portfolio


Image: "Australia and New Zealand 1788-1911" by hoovernj

Tuesday, May 16, 2006

Dublin Core


Yesterday my collendar like memory failed me when trying to think up a common DTD that people use when they're creating XML documents.

Today it came back to me: the Dublin Core is a set of descriptors (such as the title, publisher, subjects, etc.) that are used to catalog a wide range of networked resources, such as digitized text documents, photographs and audiovisual media. Often it gets used in XML documents that describe a collection of web documents or files.

This Wikipedia article explains the Dublin Core , and there's a user guide here - go ahead and create some Dublin Core metadata for yourself using DC-dot

Can you think why it might be useful to have this 'metadata' available about your web site's contents?


Thanks to Peter Morville for the pic


Sunday, May 14, 2006

Validating Website Performance

An assignment, due 29th May:

For the Validating website performance assignment you're required to write a report on the Web Development Toolbox CD you received last term.

Task 1 - Broken Links
Do a link analysis on the web pages, listing any broken interneal or external links on the CD. You will need to run this on a PC with an internet connection to test the external links.

Task 2 - Download Times
Look for any large files on the CD - those that would take more than 10 seconds to download over a dial up connection. What impact would these have on running the disk from a web server. Specifically, how long would these files take to download over a 56k modem? What could be done to minimise the wait for users with slow connections?

Task 3 - Usability
Create a list of 5 tasks for a typical user to complete. Tasks might be somthing like: "find a list of common graphics file formats and what they're used for". As far as possible, the tasks should be tasks that real users would want or need to carry out when they use the toolbox.

Take a volunteer and sit them in front of a computer running the Web Development CD. Tell them you're going to ask them to carry out a few little tasks for you. Make sure that you tell them it's not they who are being tested; reassure them that you're only interested in getting data about how easy the website is to use.

First, ask them if they would use such a site if it were available. You don't need to make it too much like a market research survey but a few questions like that would be useful.

Be sure to record their answers! If you like, you can use the CamStudio software, a video recorder or voice recorder to make this easier for you to review later.

Ask the user to carry out each of your tasks one at a time. Don't say anything to them, other than what the task is.

Watch them as they attempt to do the task. If they say anything, make sure you record it. Also be sure to record instances where they press the wrong button and finish up at the wrong page. Be sure to make a note if they get lost!

If a user does get lost, gently point out where they made the mistake, and show them the correct way to achieve the task.

Write a report detailing the overall outcome of the performance and usability project. You should recommend changes to the CD based on both the performance measurements and the usability tests.

XML, DTD, RSS and other 3 letter combos...


This week we're going to conquer those pesky 3 letter acronyms: XML, DTD and RSS.

XML
Like html, xml uses tags to delimit data. Unlike html, it's very unforgiving of syntax errors - mistyping the tag name, mixing upper and lower case, inproperly nesting tags and leaving out closing tags are all sudden-death events for an XML document.

For the important bits on XML, please read through the following W3Schools pages:


Introduction to XML
What is XML, and how does it differ from HTML?


How XML can be used
Some of the different ways XML can be used.


XML Syntax
The strict but very simple syntax rules of XML.


XML Elements
XML Elements, relationships, content and naming rules.


XML Attributes
How XML attributes can be used to describe elements or provide additional information about elements.


XML Validation
The difference between a Well Formed and a Valid XML document and how a DTD is used to define the XML document.


which brings us to our next acronym:


DTDs

XML's big trick is that you get to define the tags, which means you can use XML to describe just about any data.

So that other computers can understand what you're talking about, you need to give them some hints. Theat's where the DTD comes into the picture. A Document Type Definition dictates what the legal building blocks are for your XML document.

Once again, let's check out W3Schools for a DTD Tutorial

The good news:
We don't need to know how to build an XML document from scratch (yet).

The bad:
We do need to know how to create valid XML documents that conform to DTDs created by other people.

Here's one to practice on:

Google sitemaps are XML documents that describe websites so that the google search engine can crawl through them and include them in their search results.

Now, google will find pages by itself, but by using a sitemap you can speed up the process, and guide the robot to your best pages first. For your assignment: create a sitemap of your Bathurst TAFE web pages that conform to the Google sitemap specification - validate the sitemap and print the results, and submit them to me along with a printout of the sitemap itself.

Extra but interesing:
To add your own attributes to the XHTML specification you'll need to know how to extend existing DTDs.

RSS
One of the high profile uses for XML is RSS.

Really Simple Syndication has been used for years by web sites to broadcast the availability of fresh content; listing new pages in an XML file which special programs called aggregators can pick up and process, and tell real people about fresh content that they can read.

Like everything on the web, RSS has evolved. The important milestones are RSS 0.91, RSS 2 and the Google supported challenger: Atom. Read all about them on the Wikipedia

Coming up (next week?): we'll be looking at how to create a form and some script that will allow you to generate RSS 0.91 files for new pages as they're added to your TAFE website.


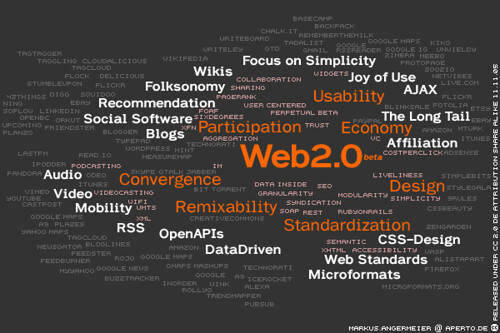
Thanks to kosmar for the
Web2.0 - extended mindcloudmap


Monday, May 08, 2006

more on the emerging web tech assignment

I'd hoped to have this conversation with you face to face, but a small accident this morning has kept me at home.

It's about the emerging web technology assignment I set last term. Frankly, I haven't seen enough evidence from anyone (except Matt), that you know the topics.

The idea behind having you blog and comment was that you could prove to me that you knew enough about each of the topics to either add some information, ask a pertinent question or answer a question posted by someone else - on each and every topic listed.

So, I need some more postings with solid evidence of subject mastery in them - failing that I guess we could go back to the tried and true: 'write me a 3000 word essay on the following topics...'

To be honest, the whole blog thing's a bit of an experiment, and has taken me more time than marking essays would have, so I'm more than happy to do the paper thing. I just thought it might be a better learning experience for you folks to read, analyse and comment on other postings, not to mention a bit less of a chore. The subject we're currently studying: Complex Markup Language Documents has an essay writing component too (about XML, RSS, DHTML and DTDs) - what would you like to do about this? More blogging or a straight up essay? Post a comment here to let me know.

In the meantime - please add some more content to the collected wisdom of the class blogs on emerging tech...

Sunday, May 07, 2006

Forms, CGI and PHP

Last week we played with some nifty form elements. If you missed the action, or just want to revise, the W3C have the definitive word on forms here, or you can find a gentler introduction on w3shools.

This week we'll try to implement a simple form. See if you can re-create the following useful web page:


Set the form's action attribute to point to dump-globals.php - which you can pick up from either here (if your outside the TAFE lab) or here (if you're inside the firewall).

Copy your new web page and dump-globals.php onto the bathurst-tafe web server, set the permissions, and test the page using both GET and POST methods.

If you have the time, you might want to see how to
create forms using CSS